Supplies:
Paper pattern ~ I like to print out my patterns using construction paper or scrap pads from the $ Stores - lightweight and tear off very easily
Assorted fabric scraps in various sizes
Straight pins
Iron
Jack the Ripper
Paper scissors
Rotary cutter
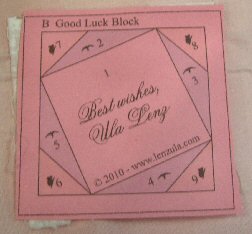
When you are ready to sit for a bit and give this a try, first off look for an easy beginner block to try. Quilters Cache has quite a few. The one I am using for this example is from Ula Lenz's drool worthy site:

Using your paper scissors, cut the blocks apart but keep the small picture of the finished block handy. This is important if you have a tendency to get lost in the pattern or get interrupted frequently and forget what you are doing.

Place this piece right side up. In other words, wrong side of fabric to the back of the paper pattern.
Next you will begin to add your next piece. You will place this piece right side down. Your fabrics will now be right sides together. Sew on the line that says 2. once completed, flip over press and trim close to the seam. Be sure you sew until you reach the seam allowance line.


A word of caution . . . Notice how much larger the scrap piece I am using is compared to the actual size on the template? I have learned to err on the side of caution when it comes to making sure the small scrap I am using will be enough to cover with plenty of seam allowance once it is flipped, pressed and trimmed.
Continue around your block, adding your fabrics.
One little puzzle block done and now I am on another one.


Here is where I show you where to trim: Can you see the seam where I have sewn? Fold back your paper


Once you have have all your little blocks sewn, it is time to get out the rotary cutter and mat

Trim them neatly with your spiffy rotary cutter on the outside seam line. I know your stitches don't reach that, but you will see why that matters in a minute

Now is the time it is a good idea to have your master block picture available for scrutiny. Almost like a jigsaw puzzle, right? Start matching your blocks and right sides together, sew them on the 1/4 inch seam. It may help to have a pin hold in place until you get started on the stitch.

Continue matching seams and soon you will have a gorgeous block with accurate points!


Bring back to your mat and finish cleaning those edges up. Voila!

A few things I would like to add here. First off, you may think you are going to have loads of wasted fabric. Once you get the hang of it, you really truly don't. I would suggest using dedicated scraps or really ugly fabric that you have stashed away to practice with. A really easy block to start with is:
The Economy Block
It is very helpful to press with a hot iron. I keep my iron at sitting level so I can swivel around and press those puppies.
I am certain I could have taken a real step by step of each step. But there was no one to take pictures while I sewed the paper, and pressed the blocks. Just me. However, just get in your mind the visual image of me swivelling. That should make you smile enough to want to try your hand at paper piecing. It really is easy, addictive and makes your work look like you really know what you are doing.
6 comments:
Hi! I love this little tutorial! I think i will love paper peicing as well!
Way to go, Blondie!!! I am not a good paper piecer, but you have a great tutuorial!
christine
intersesting
Hi! I just wanted to send a quick note. Tonight I did my first paper piecing. I used your tutorial Nd with a few tips from my sister (she is a pro) and 6 hours I almost have a block done. I think i picked an advanced block but I like it. I was determine to learn on my own and you helped so much. I will blog about it soon. Thanks for the tutorial!
Miriam
Hi Miriam
I am not the best teacher and am sure I should have done more pics along the way. Good thing you had your sister to help you out! Looking forward to seeing your block.
Wishing you many blessings
Blondie
Thanks for the great tutorial Blondie! I haven't done any paper piecing but this makes me want to. Such a cute little block.
Love the new look of your blog!
Post a Comment